RIMS
If you are not of legal drinking age in your country of residence then you are not allowed to visit this site. You are trespassing and are not allowed to read even one word after this paragraph. Not one word you understand? I said not one word... Now if you're too darned young to read this now go to your room and have a 10 minute time-out.
Gwan now... Scoot! You're being watched! ![]()
:)
![]()
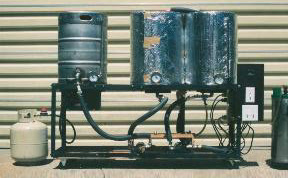
So you made it to my RIMS page. Congratulations! Well, let me tell you a bit about RIMS. As far as I have been able to find out, RIMS only applies to the process of mashing. There's more that can be done with the same equipment though & how you apply what you have to make beer makes it easier over-all to use. Let me first tell you about the equipment I have and why it's useful to me.
There are three salvaged 15 gallon Stainless steel (SS) 1/2 kegs I use. Each of these has a 1/2" SS valve heli-arced into it.
The first is the boil kettle and it has a SS false bottom with a hole in the center. A siphon is attached by a quick disconnect to the 1/2" ball valve on the side and goes into the hole. The siphon rests 1/2" from the bottom of the kettle. The false bottom is from the SABCO company.

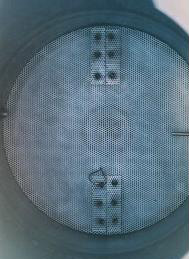
The second kettle is called the Mash Tun and it also has a false bottom but there is no hole in the center. In this keg there is a 1/2" ball valve attached to the bottom in the center. You can sort of see that through the perforations in the screen.
As marvelous as they are I feel is a small design failing with the SABCO false bottoms:
#1. There is no support in the center to withstand the weight of the grain. The company disagrees and says it is strong enough to withstand any such weight. Rather than find I was right during a brewing session. I "fixed the potential problem prophylacticly. I did this by purchasing a 3/32" SS screw & bolts and ran it downward till the screw bottomed out against the vessel. I measured that length and cut the excess off the threaded end. Then I used a nut & lock washer from the bottom side to hold it in place & wala no sag & the bottom is secure. This was a later mod I made and isn't in these photos.
#2. The false bottom without the center hole was a problem to get out with the thermometer probe in the way. It would not collapse as the hinge faces downward & you need a hook on a thin rod to remove the false bottom. Considering it's got grain on it at that time it's a challenge. My solution was to use a 5" piece of bare solid copper electrical wire & I ran it through two of the holes in the bottom & then twisted the ends together. Now I have a permanent handle to pull the bottom out with ease. You can see the "handle" at the top left of the lower hinge in the above photo.
The third kettle is called the sparge vessel. It has a hole in the center and has the valve at the bottom but there is no false bottom needed here for all this vessel does is hold hot water for what is called sparging. Sparging is where you introduce water at 170 degrees to the mashed grains. You do this to rinse the mashed grains of residual sugar that was released during mashing. Sparging is not necessary to make excellent beer but it must be done if you are to maximize your yield of sugar from the grain. There's no inside picture with this as it's just a kettle with the hole for the ball valve in the bottom.
The next item is the heart of the RIMS brewery and that's the RIMS chamber. Mine is Stainless Steel, 34" long including the ends and 3" in diameter. Inside the chamber is an "ultra low-watt-density ceramic hot water heating element which is designed to heat at 6,000 watts at 220V but I run it at 120 volts and it heats up to 1,600 watts. The element is folded in half and then folded in half again so its length is 22" but if straightened out would be over 80" long.
![]()
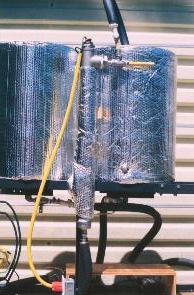
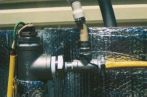
At the output end there is a thermocouple which senses the temperature of the liquid that passes out of the chamber. In addition there is the outlet for the heated mash to circulate. In this picture you see the electrical wires running to the heater element. The vertical hose coming off the "T" is the outflow and it's going back into the mash tun. The yellow plastic running horizontal is a sleeve I put over the thermocouple to keep its wires from bending. At the right is how the chamber looks dis-assembled. It is extremely important to know that when in operation there is a cap on the exposed contacts at the heater element. They are bare here in the photo for demonstration. If someone were to touch such bare elements with the power on, there would be more than mash that would be in hot water... I slide a cap over the top & I believe it's originally from a spray paint can as it fits perfectly snug.
By the way, you will notice a layer of metalized bubble wrap used as insulation which surrounds the Mash-Tun, the Sparge vessel and the RIMS chamber. The insulation is on the bottom of the Mash & sparge vessels as well as the cover on the top. This greatly reduces the heat loss and makes the system much more economical and responsive to changes in temperature. You can see this insulation in many of these photos. I recommend it highly & it's a common home insulation. It can not withstand the temperature necessary in the boil kettle so that vessel remains un-insulated.
One of the things that makes this so easy to use is the PID computer. PID stands for Proportional Integral Differential which are the three aspects of control it uses. Click here to read the technical aspects of how a PID control works. The one I have is an Omega CN9000A series with an output module that triggers a positive DC voltage. When the "set temp" is too low the PID sends a DC signal. This DC voltage goes to a solid state relay and the business end of the relay closes and allows the heating element to turn on. All the opening and closing of circuits is silent because there are no mechanically moving parts so nothing will physically wear out from use. Once the set temp I selected is reached, the signal stops and waits for the thermocouple to indicate a dropping temp & the cycle starts over again. This control allows a one degree F temp accuracy. Having all the insulation on the mash-tun, hoses and RIMS chamber makes a really nice difference.
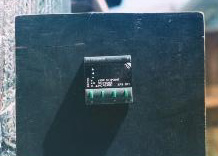
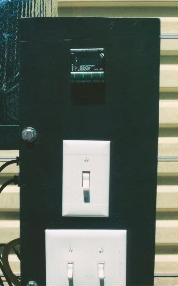
the first photo shows the front of the PID. The second Photo also shows the on/off for the heating element and the on/off for the two pumps. The third shows a side view and the wires you see from the PID are for the thermocouple and power to the PID & to the Solid State Relay.
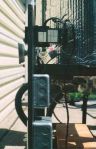
Notice in the photo to the right that you can see one of the 1/2" SS valves coming from the bottom of the Sparge vessel. There is a similar one coming from the Mash-Tun as well.
Most home breweries that are on a framework are multi-tier meaning they use gravity to get sparge water into the mash-tun and to do this the sparge must be higher than the top of the mash tun. If they want to use gravity to get the mash into the boil kettle then the boil kettle must be lower than the mash-tun. Considering the size of the kettles (15 gallons) the top of the third kettle requires a step ladder to get to. Worse yet you need to manually move hot water to the top for the sparge which can prove to be a pain. Most people use a two tier system with a pump to move hot water around & this is better but still there's an element of height to it I didn't care for. Unless one uses a pump to move the boiled wort to the fermenter, the boil kettle must be high enough to allow gravity to evacuate the kettle. If you consider the addition of an in-line wort chiller, the bottom of the boil kettle must be close to 30" from the ground.
Being essentially lazy I decided to do something completely different and make everything on one low level and have a one tier unit. To do this I needed to have two pumps:
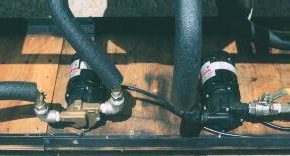
Both of these pumps are March magnetic pumps and as such are quiet and they have the pump head isolated from the rest of the motor. Good sanitation & a nice flow. You'll notice one has a metal head & the other is plastic. The metal head can handle boiling temperatures the plastic head comes close. You'll notice the black around the hoses & that's piping insulation to prevent heat loss. The output from the pump on the right is dedicated to the RIMS chamber. The one to the left pumps hot water to the sparge vessel at the same time the pump on the right is running the RIMS mash. When I am ready to sparge I reconnect the pumps so the sparge comes into the mash tun via the RIMS chamber and the output from the mash-tun is simultaneously pumped by the left pump into the boil kettle.
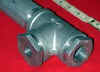
The sparge arm is made of 1/2" copper pipe, 1/2" copper "T"s and 1/2" 90 degree connectors. The idea is to allow Recirculating mash to not disturb the grain bed. If the grain bed remains undisturbed and the mash circulates without incident through the grain bed and out the bottom and then gets heated in the RIMS chamber re-entering the mash-tun at the top to repeat the same cycle, you have a perfect filter to filter out particulates in the mash. An additional and extremely important benefit is you have a constant & equal flow of mash at a uniform temperature passing by each crushed kernel of grain in the Mash-Tun. This assures each grain gets equally bathed in water and the enzymes get to act equally on each kernel & this gives the maximum extraction of sugars from each grain.
If by chance the grain bed is disturbed by water coming in a stream then the liquid will tunnel through the grain bed and it will take the path of least resistance. The result will be a failed mashing for the grain on the periphery will have been surrounded by a stagnant flow. ( When people brew and do not use a RIMS they must constantly stir the mash and they must have a burner under the mash-tun to keep the temperature correct. ) If you pay attention to the details you will get an excellent extraction of sugars but it is much more time intensive stirring & stewarding the mash temperatures. It's my belief that the smooth and steady flow of the RIMS with it's precise & homogenous Mash-Tun temperature level will have to provide a markedly better extraction than one would hope to get than by stirring the mash.
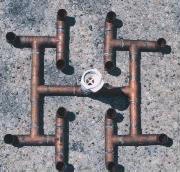
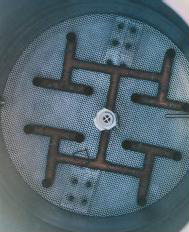
The Photo on the left shows the sparge arm and the Polysulfone quick disconnect. The photo on the right shows the sparge arm in the mash-tun. In operation there would be grain 3/4 of the way to the top and the arm would be resting just barely below the water line so as to not disturb the flow. The mash liquid comes through the disconnect and exits through the 12 openings. As there's a low flow the grain bed never gets disturbed.
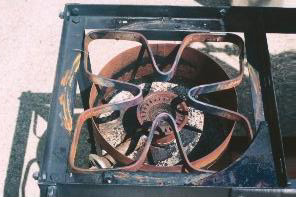
Everyone I know of with both a RIMS and conventional brewery have two burners and some have three. Those with three have one under the Boil kettle, one under the Mash-Tun & one under the sparge vessel. Those with two have one under the boil kettle and one under the mash tun and they use a pump to move the sparge water. My system is able to get by with only one burner because I have the two pumps. My burner is under the Boil Kettle and this enables me to have the other kettles have the drains & valves on the bottom. I use the Camp Chef burner and designed the stand to fit this easily. It's bolted to the framework. After designing the layout and assembling the frame I discovered the heat from the burner was ruining the bubble wrap on the mash-tun next door so I had to chop the frame and add another 18" of distance. In the photo below you can see the overlap at the lower right. Also, I have screw-in thermometers in all three vessels and in the Boil kettle and the Sparge vessel I have sight glasses which show the current fluid levels. I marked them with one gallon increments. To protect the thermometer and the sight glass on the boil kettle you'll notice a flat plate in the lower right hand corner. This works well and I have had no problems. I am looking for a source of either old asbestos plate or ceramic wool to add to this metal heat deflector though. The temps are still high enough that cooler would be better.
The framework came from junked bed frames I got at the local recycler & cost $5.
The control box for the wiring came from the Dayton Ham radio swap meet & it's bolted to the side of the frame. Inside are the Solid state relays to power on & off the RIMS heating element and the wiring for the pumps, PID and the heating element. Rather than have a spaghetti plate full of wires, I mounted wall plugs conveniently and everything gets connected to them. The switching happens inside the box and the pumps have on/off switches on the front panel below the PID. I chose to connect the heater with a wall plug simply for ease of removal when I want to clean the RIMS chamber after use. This is a view of the box from the side showing the pump wiring.
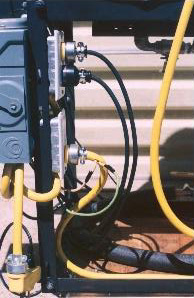
To the lower left, the yellow wire is where an extension cord connects to give power. The "Z" shaped yellow cord goes to another outlet which the vertical yellow cord connects to. This goes to the heater element and simplifies removing the element from the chamber.
One of the advantages of this one tier system is a marked ease in cleaning. That's not to say clean-up is a snap but rather it's not a royal pain either. Having the tops of all three kegs at chest level makes it easy to add grain & remove the spent grain. Speaking of grain, I use a malt mill & reduction gear motor to grind the grain. I'm going to need to find a different device I'm afraid, I think one of the internal gears is a bit worn. I do use gravity to drain the boil kettle and I use a counter-flow wort chiller which I made from 25' of 3/8" copper pipe inside a garden hose with compression fittings on the "T"s at both ends. Water runs through the hose cooling the copper pipe. In real time the temp changes from 212f to about 75f in 15 seconds. The counter flow chiller is a great way to go. I have no photo of the counter flow but will add that when I find a scanner to use.
The water is filtered through a home in-line charcoal filter I bought for this purpose alone. The Charcoal filter leaves the minerals and removes the local water taste & odor. I used to use the Brita water filter till I read on their label it's an Ion exchange resin and while perfect for drinking water, it'll tend to remove minerals as well. Since I want the minerals in the water the carbon filter made the most sense.
I can usually brew five ten gallon batches on one tank of propane which isn't too bad considering one of those was a Barleywine and I boiled for several hours to help concentrate the sugars. I got the PID on Ebay and most of the common parts from home depot. Unfortunately Moving brews who was the supplier of the RIMS chamber, Norprene hose, Polysulfone quick disconnects, full bore Stainless 1/2" valves, special thermocouple, custom stainless & Teflon compression fittings and the pumps... has closed shop. He has kindly left his old web site on the internet and you can look at what he sold & use that to find similar items elsewhere.
The stainless false bottoms are perfectly fit for this kind of keg/kettle and I bought these false bottoms from SABCO. This is the company that makes them and though their products are pricey, they are made to fit the bill and do so with nice precision. It may be worth your time to find one of their products sold at a lesser price than factory direct. There are two serious failings with their false bottoms though. I remedied these by the methods I'd shared with you at the beginning of this page.
Sanitation wise I've ended up using PBW by Five Star Chemicals for removing old organic material in my kegs, hoses and bottles and I use their Star San for sanitizing. It's great stuff and makes cleaning and sanitizing as easy as it will probably ever be. I bought one of their larger containers of each & it's always a good savings.
I'm slowly moving away from bottles. I have them and use them but I've found it's so much easier to just put the fermented beer in a 5 gallon corny keg. It saves so much time, it tastes great and it's much more convenient for I'm not forever making sure I've washed out the bottle before putting it away else I get huge clots of mold in the bottom of the bottles. Cornys are like $15 each and the rebuild kit to remove all the soda pop scented rubber parts is another $6-7 but they clean up and sanitize so easily it's foolish not to use them. I've got like 8 of them and need 5 more. Two are filled with barleywine and they won't be tapped for another two years.
![]()
I'd like to thank the following people for their help in my getting this going. There are so many creative ideas they helped me with that I know what I have now would not be nearly as good were it not for them.
C.D. Pritchard: One of the first RIMS brewers and a really helpful guy.
Bill Stewart:
Was the owner of Movingbrews. He was always willing to give his all to help a
brewer do better. Bill was an unbelievable help to the home brewing community.
We can only hope someday he decided to be involved with Movingbrews again.
The members of the Homebrew Digest:
A listserver
& one of the best brewing resources & sponsored by Northernbrewer.com
I'm really embarrassed I can't recall all the people that have helped me out. When I was trying to make sense out of everything I did a google search for RIMS and contacted so many of the people it came up with. I thought I'd kept track of all the replies but I've had a few computer crashes an maybe that's why I can't find them today. That's probably more an excuse for my not keeping good records... If you read this & you helped me out & I didn't include you, please email me ASAP because I'd like to add you to the above list.
![]()
One Tier Breweries: This one is a trick because I'm the only one I know of so far with a single tier brewery & clicking here just takes you back to the top of the page.
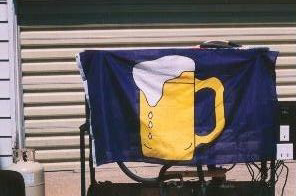
My Brew Flag goes up every time I brew. It gives the neighbors something to laugh at but God Bless em' every one of them prefers to drink the cheapest swill in the supermarket. Who's laughing at who?
.
.
Always remember to use Safe Sex!
![]()
In this wonderful age of litigious non-responsibility you find Safety pin makers having to warn that pins are sharp and electric heater manufactures have to tell you not to put the heater in the bathtub. In 2003 a collection of geniuses in the Katy School district of Huston suspended a 13 year old honor student because she brought a pencil sharpener to school. As it has a blade to sharpen the pencil it is considered a dangerous weapon and she was suspended accordingly. "If we vary from the rules, that's when the rules fall apart," said Katy School school district attorney Christopher B. Gilbert. It is within this same city several years earlier a student suffering from Asthma attacks was suspended for bringing their asthma inhaler to school. Because of asinine laws, idiot legislators, ambulance chasing attorneys and the overwhelming abundance of human stupidity and greed which is increasing in volume on a daily basis, I am forced to make this statement: I completely disavow anything written on this or any web page I have created: Nothing on this or any of my web pages is considered completely accurate. Nothing you read here or follow a link to is considered to be completely correct. Everything you read is my opinion or if relates to a link found on my web page/pages, it is someone else's opinion. Everything on these web pages is strictly an opinion for consideration for discussion and research only.
Isn't having to put this Politically-correct Disclaimer crap on a fun page just the best thing since man learned to walk.
Know what? If there were attorneys back then & the inventor of walking showed someone how to walk, some attorney would have been there to help sue that inventor when their student fell.
![]()
For a percentage of the take of course.
( & you know that is the absolute truth don't you. )
![]()
Gary Smith
Cheers de KA1J
Any pearls of wisdom are expected & appreciated.
|
|
|
|
|
Visits since Nov 26, 2003
![]()